Whenever your blender sounds like it is gasping for air, you are likely dealing with cavitation. Prevent it by loading the jar in the right order, start with liquid, then add soft ingredients, and save hard pieces for last. Leave enough room for the mixture to move, use enough liquid to cover the blades, and begin at a low speed before increasing it. If the center goes hollow, you are close to a fix that is simpler than it looks.
How to Spot Blender Cavitation
So, how can you tell when a blender is cavitating? You’ll notice the warning signs quickly if you stay close and listen. The blend may thump, speed up, then stall, and the texture can look uneven or foamy.
Blending sounds often change as well. The motor may get louder, thinner, or strangely hollow, as if it’s gulping air. You may see a pocket form above the blades, or ingredients may cling to the jar wall instead of moving downward.
When that happens, the blend isn’t failing you, and you aren’t doing anything wrong. It’s simply signaling that the flow has broken down. Trust your senses, pause, and check whether the mixture is still circulating smoothly. If it’s not, you have likely caught cavitation in time to help it recover.
Why Blender Cavitation Happens
Blender cavitation happens as soon as the ingredients stop moving the way they should, and the blades start pulling in air instead of solid food.
You usually see it when the jar is packed too tight, the mix is too thick, or the flow can’t form a steady swirl.
Then air pockets open up, and the blades spin without grabbing much at all.
That weak contact creates motor strain because your blender works harder for less reward.
It can also lead to blade wear over time, since the system keeps grinding against the same stalled load.
If you have felt that sudden empty whirr, you aren’t alone.
Your blender isn’t being dramatic.
It’s telling you the blend has lost its rhythm and needs better circulation.
How to Prevent Blender Cavitation
To prevent blender cavitation, start by giving the blades what they need most: movement and liquid. Load wet ingredients first, then add softer foods before harder ones. Keep the jar clean, because well-maintained blades help the mixture flow smoothly. Temperature control matters too, since very cold mixtures can slow blending and trap air.
| What you do | Why it helps |
|---|---|
| Add liquid first | Keeps ingredients moving |
| Use smaller batches | Reduces crowding |
| Start at a low speed, then increase it | Builds circulation |
| Stop when a hollow forms | Lets you correct the flow |
| Check blades often | Supports steady blending |
When you blend this way, you work with the machine instead of against it.
Choose the Right Liquid Amount
Getting the liquid amount right can make the difference between a smooth blend and a noisy, stubborn mess. You want enough liquid depth to cover the blades well so they can pull ingredients down instead of spinning air.
Aim for a liquid ratio that matches your recipe, especially with thick mixes. Start with liquid first, then add solids slowly.
If the blend stalls or sounds hollow, pour in a little more liquid and let it catch up. This small move often brings the whole mix back together.
You aren’t failing the recipe; you’re simply giving it room to flow. When the jar has the right amount, your blender feels calmer, and you do too.
Keep Ingredients Loose and Even
When you keep ingredients loose and even, the blender can move them around instead of fighting one heavy clump. You help the blades when you leave space between pieces and build even distribution across the jar. Start by spreading soft and hard items apart, then tuck in leafy or chunky bits without packing them tight. That kind of ingredient spacing lets liquid reach every side, so air pockets don’t settle in.
If you pile everything in one spot, the mix can stall and leave a hollow center. Instead, consider each ingredient part of the team, not a crowd at the door. When the load stays open and balanced, your blend feels smoother, and you’ll save yourself from that frustrating blender grumble.
Start Blender Cavitation Prevention at Low Speed
Start the blender on low speed so the blades can catch the ingredients without trapping air.
Then raise the speed gradually as the mixture begins to move smoothly.
This steady increase helps prevent cavitation and keeps the blend from stalling.
Low-Speed Start
Starting your blender on low speed gives the ingredients a chance to settle into a smooth flow instead of fighting the blades right away. You help the jar build a steady swirl so air pockets don’t grab the mix and stall it. Keep the liquid base near the blades, then use a speed ramping technique only after the contents begin moving.
If the blend feels stubborn, a quick pulse startup timing can break up a thick spot without flooding the motor with strain. You aren’t rushing the job; you’re guiding it. That calm start makes the whole batch feel easier, like everyone in the jar got the memo. Add a little more liquid if the center hollows out, then stay patient and let the motion settle.
Gradual Speed Increase
A gentle speed ramp keeps the blend calm as it thickens, so the blades can keep pulling ingredients down instead of beating air into the mix. You should stay in control here, not fight the machine. Start low, then raise the power in small steps with speed ramping techniques.
That gradual power shift helps the vortex stay steady and keeps hollow pockets from forming around the blades. Whenever the mixture still looks stiff, pause for a second, add a little liquid, and continue with another small increase. You don’t need a big jump to get smooth results.
Think of each step as helping the jar settle in. As you listen to the sound and watch the flow, you’ll notice the blend stay smoother, quieter, and much easier to finish.
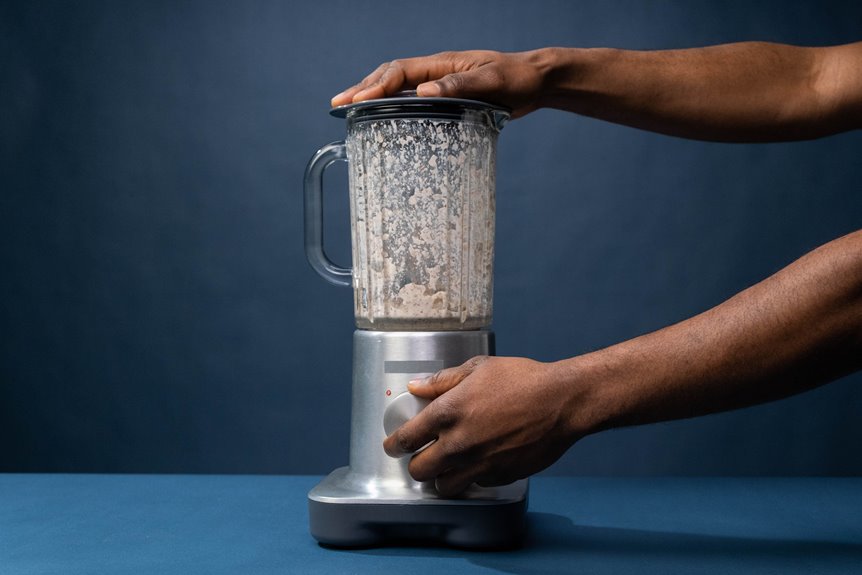
Stop Air From Getting Trapped
Trapped air can turn a smooth blend into a stubborn, noisy mess, but the good news is that it’s usually easy to fix once you know what to watch for. You can stop it by using liquid layering, then adding dry ingredients slowly so the blades stay covered. If the mix starts to hollow out, pause and clear the air pocket carefully before you restart.
- Pour liquids in first.
- Add wet ingredients before dry ones.
- Keep the blades covered.
- Stop and clear a pocket quickly.
You will also improve flow by keeping your batch balanced and avoiding an overcrowded jar.
Once you hear that slurping sound, adjust right away. That quick response keeps your blend moving smoothly instead of fighting it.
Pick a Jar Shape That Reduces Cavitation
The shape of your blender jar can make a real difference when you want to prevent cavitation. You’ll often get better vortex stability from a jar that tapers gently toward the base because it guides food toward the blades instead of letting it swirl in a flat loop.
A narrow bottom can help the mix move downward, while smooth sides keep ingredients from hanging up in corners. If your jar is wide and boxy, you may notice more air pockets and a weaker pull at the center. Choose a jar that matches your blends, and you’ll notice the difference quickly.
With the right shape, your ingredients flow together more easily, and you don’t have to fight that frustrating hollow whirl.
Check Your Blades and Their Position
When your blender keeps making that hollow whirring sound, check the blades and how they sit in the jar. A quick inspection can save a lot of frustration. Look for blade alignment, because crooked blades can spin unevenly and leave air pockets. Also check for blade wear, since dull or chipped edges won’t grab food well.
- Unplug the blender before inspecting it.
- Remove the jar and inspect the blade base.
- See whether the blades tilt, wobble, or sit too high.
- Replace worn parts before they strain the blend.
If the blades look clean but the mix still stalls, their position may be off inside the jar. A snug fit helps the ingredients move toward the center, where the action happens.
How to Fix Blender Cavitation Mid-Blend?
If your blender starts cavitating mid-blend, you can usually correct it by reducing the ingredient load so the blades can catch up.
Then add liquid a little at a time, which helps the mixture move again and clears trapped air pockets. This small reset often gets the blend back on track without needing to start over.
Reduce Ingredient Load
Sometimes the fastest fix for blender cavitation is to ease the load and give the blades room to breathe. You can reduce the load by pausing and checking whether the jar looks crowded.
When the mix is packed too tightly, the blades spin in a hollow pocket instead of grabbing food. So, limit batch size and let the ingredients move as a team, not as a jammed crowd.
- Scoop out a few spoonfuls
- Keep chunky add-ins for later
- Leave space near the blade
- Blend smaller rounds, not one heavy heap
That small reset can restore smooth movement and keep you from fighting the blender as if it’s having a bad day. You aren’t failing your recipe. You’re just helping it flow better.
Add Liquid Gradually
A cavitating blender often needs a little more liquid, but the trick is to add it slowly so you don’t drown the whole mix. Pause the blender, then pour in a small splash along the side. This gradual liquid addition gives the blades room to catch the ingredients again.
Watch the center of the jar. When the vortex returns, you have hit the right liquid adjustment timing. When it still sounds strained, add another spoonful or two and restart on low speed.
You aren’t fixing a race, just helping the mix settle back in. Keep the lid on, blend in short bursts, and stay patient. A calm hand usually brings the whole batch back together, and that feels good.
Avoid Common Blender Cavitation Mistakes
The good news is that most blender cavitation problems come from a few simple mistakes you can fix quickly. When you start with enough liquid, you give the blades a smoother path and help the mixture stay together. Your ingredient layering strategy matters too because wet ingredients should go in before dry or frozen ones. That order helps keep the blend moving instead of leaving you with a noisy jar and a weak swirl.
- Pour liquid in first.
- Add soft, wet foods next.
- Place hard or frozen pieces last.
- Stop when the center goes hollow.
If the blend stalls, add a little more liquid and restart on low speed. These small steps help create steady flow and better results.
Frequently Asked Questions
Can Frozen Ingredients Increase Cavitation Risk?
Yes, frozen ingredients can raise cavitation risk. Their density and the way they affect blade temperature can stall flow. You will blend better if you add them last, use more liquid, and keep the batch moving smoothly.
Should I Warm Ingredients Before Blending?
Yes, you can let ingredients warm slightly before blending when they are very cold. This helps with ingredient temperature and improves blending consistency, so the blend flows more easily and feels smoother.
Does Blending Time Affect Cavitation?
Yes, longer blending can worsen cavitation if you keep the motor speed high and the blade design is poor. You’ll get better results by pulsing, pausing, and adjusting the liquid so the mixture keeps moving smoothly.
Can a Tamper Safely Clear a Blender Air Pocket?
Yes, you can use a tamper safely if your blender manual allows it. Keep the tamper moving steadily to clear the air pocket, and never touch the blades.
Does Jar Fill Level Change Cavitation?
Yes, jar fill level does change cavitation. You will do better by keeping liquid above the blades and staying below the fill mark. With the right jar volume, you will reduce air pockets and help your blend move smoothly.